How to Secure a Fence Against Strong Winds
By BabyLoveGrowth AI
The fastest way to stop a fence from blowing over is to reduce what engineers call “sail area” and lock the posts down with real anchoring, not just gravity and friction. That means bracing weak panels, driving temporary anchors at the base of leaning posts, and, longer term, resetting posts into properly sized footings rated for your local wind exposure.
Wind engineers size fences the same way they size roofs and walls: using ASCE 7 wind maps and the exposure categories built into the International Building Code. A standard 4x4 post with 24 to 30 inches of embedment works fine in a sheltered backyard, but a 6x6 post needs 36 to 48 inches in an exposed, high-wind location.
Here’s the roadmap for the rest of this guide:
- Right now: temporary bracing, ground anchors, and reducing wind catch
- This season: permanent post, footing, and hardware upgrades
- When it’s out of DIY territory: engineered drawings and permits
A 6-foot solid privacy panel presents roughly 48 square feet to the wind. At 80 mph, that can generate more than 750 pounds of lateral force pulling on just two posts — which is exactly why so many Los Angeles fences fail at the post, not the panel.
Key Takeaways
Wind resistance in a fence comes down to three factors working together: post embedment depth, footing size, and how much open area the design lets wind pass through.
| Point | Details |
|---|---|
| Match post size to exposure | Use 4x4 posts with 24 to 30 inches of embedment in sheltered lots; step up to 6x6 with 36 to 48 inches in exposed or coastal areas. |
| Porosity beats solid panels | Picket, shadowbox, and louvered designs cut wind load significantly compared to solid privacy fencing. |
| Footing shape matters | Bell-bottom or flared footings resist uplift and pull-out better than straight-sided pours in loose soil. |
| Know the permit threshold | Fence heights near 6 feet, coastal exposure, or flood zones commonly trigger engineered drawings and permits. |
| Get a local, spec-aware estimate | Fence-gate-estimator prices wind-rated post, footing, and material upgrades using current Los Angeles rates. |
Table of Contents
- How to Secure a Fence Against Strong Winds Before a Storm Hits
- Permanent Reinforcements That Actually Stop Repeat Failures
- Which Fence Materials and Styles Hold Up Best in Wind
- Step-by-Step Installation Checklist for a Wind-Ready Fence
- Fixing a Wobbly or Fallen Fence After a Wind Event
- Seasonal Maintenance That Keeps a Fence Storm-Ready
- When Wind Loads Require an Engineer or a Permit
- Should You DIY the Repair or Call a Contractor?
- What Fifteen Years of Los Angeles Fence Estimates Tell Us About Wind Damage
- Get a Local Wind-Rated Fence Estimate in Minutes
- Sources
- FAQ
How to Secure a Fence Against Strong Winds Before a Storm Hits
You don’t need a full rebuild to get through a Santa Ana wind event or an incoming coastal storm. You need to buy time and reduce load on the weakest points, fast.
Work through this order of operations:
- Brace leaning sections first. Wedge a diagonal 2x4 kick brace from the mid-rail down to a stake driven at an angle into the ground, on the side the wind pushes from.
- Anchor exposed posts. Driven earth anchors or augered ground anchors, cabled to the post near the top rail, can hold a wobbly post through a single storm cycle.
- Reduce sail area. Pull off any loose lattice inserts, privacy screens, or shade cloth zip-tied to chain-link. That fabric turns a permeable fence into a solid sail.
- Secure gates last. Engage drop rods on both leaves of double gates and add a temporary padlock or chain so wind gusts can’t slam them open and rip the hinges.
- Clear the blast zone. Move patio furniture, potted plants, and trash cans away from fence lines. Flying debris causes as much fence damage as the wind itself.
Drive-in and augered anchors work in most Los Angeles soils, but rocky or compacted clay common in hillside neighborhoods can deflect a stake sideways. Pre-drilling a pilot hole before setting an anchor helps you feel for buried rock before you’re fighting it in 40 mph gusts.
Pro Tip: Keep temporary kick braces on the downwind interior side of the fence, not lashed to the outside. If the panel does fail, you want the brace pushing it back toward your yard, not into a neighbor’s car or a sidewalk.
Never work on a fence once sustained winds exceed roughly 35 to 40 mph or during an active red flag warning. A leaning 6-foot panel with a person underneath it is a serious injury risk, and ladders near power lines during wind events are a documented cause of electrocution. If a post is already cracked at the base or a panel is fully detached, stop, cordon off the area, and wait for calm conditions or call a licensed contractor.
Permanent Reinforcements That Actually Stop Repeat Failures
Temporary bracing buys you a night. Permanent reinforcement is what keeps the same fence from failing every time the wind picks up. The difference almost always comes down to three things: post size, embedment depth, and the hardware connecting rails to posts.
Post sizing scales directly with wind exposure. A 4x4 wood or steel post with 24 to 30 inches of embedment handles a sheltered suburban lot fine. Step up to a 6x6 post with 36 to 48 inches of embedment for open lots, canyon rims, or coastal-facing yards where wind hits the fence with nothing to slow it down first. Our fence post installation guide for Los Angeles walks through sizing by lot type in more detail.
Footing shape matters almost as much as depth. A straight cylindrical footing lets a post rock loose in sandy or loose fill soil over a few storm seasons. A bell-bottom or flared footing, where the concrete widens at the base, grips the soil against uplift and resists pull-out far better than a straight-sided pour. Concrete collars poured around an existing post that’s started to wobble accomplish something similar without a full tear-out.
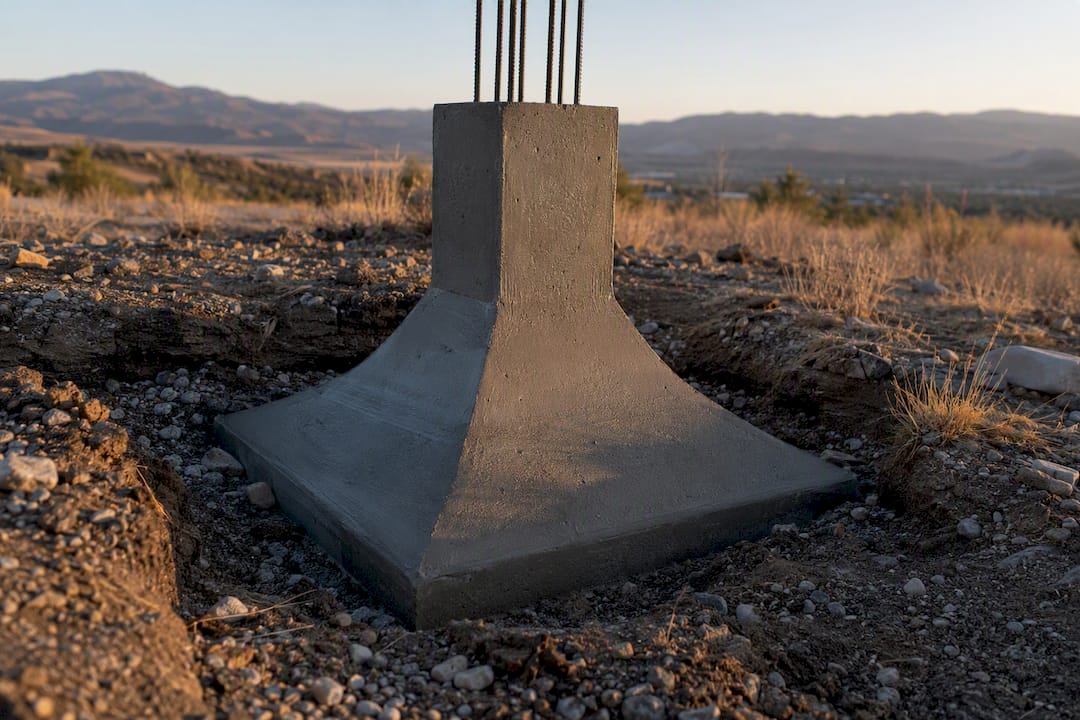
Worked wind-load examples using ASCE 7 exposure categories show that at higher design wind speeds, the overturning moment on a single post can run into the hundreds of foot-pounds, which is what actually cracks a shallow footing loose rather than snapping the post itself.
Hardware is where a lot of otherwise well-built fences quietly fail:
- Structural screws instead of nails at every rail-to-post connection, since nails work loose under repeated flex.
- Hurricane ties or angle brackets at the top and bottom rail connections, borrowed straight from roof-framing practice.
- Through-bolting for gate posts and corner posts, which carry more load than mid-span posts.
- Stainless or hot-dip galvanized fasteners anywhere near the coast, where standard zinc coating corrodes fast in salt air.
Vinyl and composite fences deserve a specific warning here. Manufacturers publish tested wind ratings, but connection hardware, not the panel material, is the usual failure point. Aluminum reinforcing inserts inside vinyl rails and through-bolted brackets at the post make a much bigger difference than upgrading the vinyl itself.
For fences that need to survive repeated storm cycles rather than one bad night, an intermediate post between standard bays, spaced at roughly half the normal interval, cuts the span each panel has to resist. Some installers pair this with a continuous steel channel system that redistributes load across the whole run instead of concentrating it at individual posts, an approach engineered steel frame fencing uses specifically to avoid the fastener fatigue that eventually loosens screw-and-bracket connections.
Pro Tip: If you’re reinforcing an existing wood post rather than replacing it, a galvanized steel sleeve driven around the buried section adds rigidity without a full re-dig, and it’s often cheaper than a complete post swap.
Which Fence Materials and Styles Hold Up Best in Wind
The single biggest factor in wind performance isn’t the material. It’s porosity, meaning how much open area the fence has for wind to pass through instead of push against. A solid 6-foot privacy panel might have zero porosity and take the full force of every gust. A picket fence with 2-inch gaps between boards can cut that lateral load dramatically, because most of the wind simply passes through.
That trade-off shapes almost every material decision:
- Wood is affordable and easy to reinforce with brackets, but rot at the post base is the leading cause of wind failure in older wood fences, especially where sprinklers hit the base daily.
- Vinyl resists rot and looks clean for years, but relies heavily on connection hardware. Reinforced posts and through-bolted rails are close to mandatory in exposed spots.
- Aluminum and ornamental steel (“wrought iron” style) tend to be naturally porous by design and hold up well structurally, though powder coating needs occasional touch-up near the coast to prevent rust bleed at welds.
- Composite splits the difference between wood’s look and vinyl’s low maintenance, with similar hardware dependency to vinyl.
- Chain-link has the highest porosity of any common material and rarely fails structurally in wind, though privacy slats or screening fabric added later can turn it into a solid panel again if you’re not careful.
If privacy is non-negotiable, shadowbox and louvered designs solve most of the porosity problem. Boards alternate sides of the rail or angle away from each other, blocking sightlines while leaving real gaps for wind to pass through. Local installers report that properly installed vinyl shadowbox and aluminum picket systems commonly carry ratings of 70 to 100-plus mph, which covers the overwhelming majority of Los Angeles wind events outside of a direct Santa Ana funnel through a canyon.
For lots that see repeated severe wind, an engineered steel frame system that captures infill panels inside a continuous structural channel is worth the added cost. It’s the closest thing to an overbuilt option in residential fencing, and it’s the right call for exposed hillside lots in areas like the canyons near Studio City or open coastal-facing yards near Santa Monica. Our custom fencing options page covers material choices in more detail if you’re comparing this against a standard install.
Step-by-Step Installation Checklist for a Wind-Ready Fence
Before a single post goes in the ground, walk the site with a few questions in mind. What’s the exposure category here, meaning is this lot open, partially sheltered by structures, or fully exposed on a ridge or coastline? Is the soil sandy, clay, or rocky? Where does water drain after a storm, and does it pool near where you plan to set posts? Are there buried utilities or irrigation lines along the fence path? And how close are mature trees whose roots could interfere with footings, or whose branches could come down on the fence itself?
Once that’s settled, the installation sequence looks like this:
- Lay out and mark post locations, keeping spacing tighter in exposed sections than sheltered ones.
- Call for utility locates before any digging, even for a straightforward residential fence line.
- Dig footings to the full embedment depth for your wind zone, using an auger or post-hole digger sized to the footing diameter.
- Set posts plumb and brace them temporarily with stakes and scrap lumber while the concrete cures.
- Pour concrete footings, using a bell-bottom or flared base in sandy or loose soil.
- Let concrete cure fully, typically 48 to 72 hours, before removing temporary braces or hanging any panel weight.
- Attach rails with structural screws and brackets, not nails, especially at top and bottom connections.
- Hang panels and fasten hardware, then do a final walk-through checking plumb, level, and gate swing.
Never remove temporary bracing before concrete has cured, and never hang a full panel on a post the same day it was set. A green footing can shift under lateral load exactly when you need it most, during the first real wind event after install.
Fixing a Wobbly or Fallen Fence After a Wind Event
A post that leans but the footing underneath is intact can usually be reset. A post where the concrete footing itself cracked, shifted, or pulled partway out of the ground needs to come out completely and get a new footing, not just a re-plumb.
Work through repairs in this order:
- Remove damaged panels first so you can see the post and footing clearly without fighting attached hardware.
- Extract the failed post, breaking up the old footing if it’s cracked rather than trying to reuse it.
- Inspect the hole for water pooling or soil that’s washed away, which often explains why that specific post failed and its neighbors didn’t.
- Pour a new footing, sizing it to the specs in the table above rather than matching whatever was there before.
- Reset and brace the post through the full concrete cure before reattaching rails or panels.
Gates take specific damage in wind events because they’re the only moving part in the whole fence. Check hinges for elongated screw holes, which signal the wood or post material around the hardware has started to fail. Reinforce with longer structural screws or switch to through-bolted hinges. A drop rod that’s bent or a latch that’s sprung usually needs full replacement rather than a bend-back fix, since metal fatigued once tends to fail again under less force the second time. Our driveway gates page covers hinge and hardware upgrades in more depth if a gate took the brunt of the damage.
If you’re filing an insurance claim, photograph the damage before touching anything, including wide shots showing the whole fence line and close-ups of the failed post or footing. Note the date and approximate wind speed if it was reported locally. If you’re planning to rebuild with upgraded post sizing or an engineered system rather than a like-for-like repair, mention that upfront. Some policies distinguish between storm damage repair and voluntary upgrades, and an adjuster will want documentation showing the failure was wind-related, not pre-existing rot or neglect.
Seasonal Maintenance That Keeps a Fence Storm-Ready
A fence that’s inspected once a year rarely gets caught off guard. Walk the fence line each quarter and check for loose fasteners at rail connections, soft or rotted wood at the post base, any post that’s started to lean even slightly, and gates that no longer swing or latch cleanly.
Before a forecasted wind event specifically:
- Engage drop rods on double gates and add a temporary chain if the latch feels loose.
- Remove any loose lattice, shade cloth, or decorative panels that aren’t structurally fastened.
- Store or secure lightweight attachments like string lights, planters, or hanging décor.
- Reseal wood fences roughly every one to two years, since sealed wood resists rot at the ground line far longer than untreated wood.
- Check vinyl for hairline cracks at rail joints, which widen over repeated wind flex.
- Treat any rust spots on metal fencing or hardware before they spread to the fastener itself.
Pro Tip: Schedule your fence inspection walk in early fall, ahead of Santa Ana season, rather than waiting for a wind advisory. Loose fasteners and early rot are easy fixes with a screwdriver and some sealant. They’re a lot harder to fix once a 50 mph gust has already found them.
When Wind Loads Require an Engineer or a Permit
Most residential fence work doesn’t need a stamped engineering drawing. But a handful of situations cross the line from DIY judgment into code-required design, and it’s worth knowing where that line sits before you start.
Design wind speed and exposure category, both defined under ASCE 7 and referenced by the IBC, determine how much lateral pressure your fence has to survive on paper, not just in practice. A fence in a sheltered suburban yard (Exposure B) faces very different numbers than one on an open coastal bluff or canyon rim (Exposure C or D), even at the same wind speed.
You’ve likely crossed into engineered-design or permit territory if any of these apply:
- Fence height exceeds roughly 6 feet, a common local threshold that triggers permit review.
- The property sits in a coastal high-wind zone or a mapped FEMA Special Flood Hazard Area.
- You’re installing a solid engineered system, like a steel-frame fence, rather than a standard panel-and-post design.
- A previous fence in the same location has failed more than once in wind.
- A retaining element or grade change is involved along with the fence line.
If you land in that territory, ask a licensed engineer for a site-specific wind analysis referencing your exposure category, plus stamped drawings showing post size, spacing, embedment, and footing detail. Bring those documents to your building department before, not after, you start digging. Worked examples using ASCE-based fence calculators show how quickly the numbers change between exposure categories at the same wind speed, which is exactly the kind of detail a permit reviewer will want to see spelled out.
Should You DIY the Repair or Call a Contractor?
DIY makes sense for minor repairs and temporary bracing: resetting a single post that’s still structurally sound, tightening loose hardware, or throwing up an emergency kick brace before a storm. Anything involving embedment changes, new footings, engineered systems, or permit paperwork is contractor territory.
When you’re vetting a contractor for wind-rated fence work, ask directly:
- Are they licensed and insured for the scope of work, and can they provide proof?
- Do they have documented experience with high-wind or engineered fence installations specifically?
- Can they provide or reference structural drawings for anything requiring a permit?
- What warranty do they offer on the installation itself, not just the materials?
Red flags worth walking away from: a contractor who suggests skipping the permit entirely, can’t produce a single reference for high-wind work, or quotes nail fasteners instead of structural screws and brackets. Our installation quality guide covers more of what separates a durable install from one that fails in the first real storm.
What Fifteen Years of Los Angeles Fence Estimates Tell Us About Wind Damage
Wind damage in Los Angeles almost never comes from hurricanes, since none reach this coast. It comes from Santa Ana funnel effects through canyon terrain and the sudden coastal gusts that hit exposed bluffs near Santa Monica and Pacific Palisades. Those wind patterns are localized and unpredictable, which is exactly why so many homeowners underbuild the first time and rebuild the second.
The properties that see repeat wind damage tend to share a pattern: an undersized post, a footing that was never sized for the actual exposure, or a solid panel where a porous design would have done the same job with a fraction of the load. Canyon-adjacent lots near Studio City and open coastal parcels near Santa Monica are the two conditions we flag most often when a homeowner’s plan doesn’t match their actual wind exposure.
Run your project through Fence-gate-estimator before committing to a design, or talk to a licensed installer about a site visit if your lot has any of the exposure conditions covered above.
Get a Local Wind-Rated Fence Estimate in Minutes
Guessing at post sizes and footing depths is how homeowners end up rebuilding the same fence twice. Fence-gate-estimator gives you a realistic, Los Angeles-specific price for a wind-rated upgrade in minutes, using current local material and labor rates instead of a national average that doesn’t reflect canyon or coastal exposure conditions.

Whether you’re pricing out reinforced posts and deeper footings on an existing fence or comparing a full engineered steel-frame system for an exposed hillside lot, the instant fence and gate cost calculator breaks down real numbers by material, post spec, and automation features if you’re adding a gate. If your project needs permit-aware planning or professional installation, our team can scope a site visit and connect you with the right specs before a contractor ever quotes the job. Try the custom fencing estimator now to see what a properly reinforced fence actually costs for your property.
Sources
A few resources cover the technical side of this topic in more depth than a single article can:
- Wind load ratings for fencing
- Fence Wind Load: Engineering, Post Spacing & Design for High-Wind Areas | FenceCalc
- Fence Wind Load Requirements: What Your Fence Needs to Survive a Storm
- How to brace a fence for high winds
FAQ
How do you secure a fence in high winds?
Reduce sail area by removing loose panels or screening, brace leaning sections with temporary kick braces, and anchor unstable posts with driven or augered ground anchors until you can install permanent reinforcement.
What type of fence is best for high winds?
Porous designs like picket, louvered, or shadowbox fencing perform best because they let wind pass through instead of pushing against a solid panel; engineered steel-frame systems offer the highest resistance for repeatedly windy sites.
What wind speed will knock down a fence?
It depends heavily on post size, embedment, and porosity, but a solid 6-foot panel can face over 750 pounds of lateral force at 80 mph, which is enough to snap a shallow footing or an undersized post.
How do you keep a fence from blowing over?
Set posts to the embedment depth appropriate for your wind exposure (24 to 30 inches for sheltered lots, 36 to 48 inches for exposed ones), use bell-bottom footings in loose soil, and fasten rails with structural screws rather than nails.
Can Fence-gate-estimator help me plan a wind-resistant fence in Los Angeles?
Yes. Fence-gate-estimator provides local pricing for reinforced posts, upgraded footings, and porous or engineered fence designs based on current Los Angeles material and labor rates.