How to Run Power to a Gate Post: A Safe DIY Guide
By BabyLoveGrowth AI
Running power to a gate post means burying a dedicated 120V or 240V circuit in conduit from your main panel to a weatherproof junction at the post, or supplying the operator through a properly sized solar and battery system where trenching is impractical. Before you dig a single inch, call 811 to locate underground utilities and confirm permit requirements with your local Authority Having Jurisdiction (AHJ). Skipping either step is the most common and most costly mistake homeowners make.
Your three core options, matched to the situation:
- Dedicated mains circuit: Common choice for most residential driveway gates, high-amp operators, or setups with multiple accessories (cameras, intercoms, loop detectors). Requires a permit and a licensed electrician for panel connection.
- Outdoor GFCI receptacle or subpanel: May be used when a weatherproof outlet is close to the gate and the operator’s amperage is relatively low. Proper burial depth and conduit protection remain necessary.
- Solar-powered gate operator: Suitable for long runs, remote gates, or properties where trenching under a driveway or through rock makes mains power expensive or impractical. Size the solar panel and battery bank according to expected daily gate cycles.
Key Takeaways
Running power to a gate post safely requires calling 811, confirming permits with the AHJ, burying conduit to the correct depth, sizing wire and breaker to the motor’s FLA, and testing every safety device before backfilling.
| Point | Details |
|---|---|
| Call 811 and get permits first | Utility locates and AHJ permit approval must happen before any digging begins. |
| Match circuit to motor FLA | Size the breaker at 125% of the motor’s FLA; upsize wire for runs over 100 ft to keep voltage drop under 3%. |
| Bury conduit to correct depth | Line-voltage circuits need 18–24 in. depth; low-voltage/data can be 6–12 in.; always confirm with your AHJ. |
| Test before backfilling | Run continuity, GFCI, polarity, and full cycle tests with safety devices active before closing the trench. |
| Hire a licensed electrician for panel work | Panel connections, breaker installation, and permit pulls require a licensed C-10 electrician in California. |
Table of Contents
- What you need to do before you run power to a gate post
- How do you choose the right power source for your gate?
- Trenching and conduit: what depth and materials does code require?
- How do you size wire and avoid voltage drop on long runs?
- How do you route conduit through the gate post itself?
- What grounding, bonding, and GFCI protection does your gate circuit need?
- How do you test and commission the system before backfilling?
- Materials and tools shopping list
- What does it cost, and when must you hire a licensed electrician?
- Los Angeles permit notes and local cost example
- What most guides get wrong about powering a gate post
- Sources
- FAQ
What you need to do before you run power to a gate post
Getting the prep right saves you from permit violations, rework, and the kind of surprises that turn a weekend project into a three-week ordeal.
Permits and AHJ checklist
An electrical permit is required for any line-voltage work in virtually every U.S. jurisdiction. Depending on your city, you may also need a separate fence or zoning permit if the gate post is new construction. In some jurisdictions, a low-voltage or alarm permit covers keypad and intercom wiring. Check with your local building department before ordering materials.
Gate installation scope typically divides mechanical work (mounting the operator, setting posts) from line-voltage work. The line-voltage connection and permit pull almost always require a licensed electrician.
Utility locates and site documentation
Call 811 at least three business days before digging. The free service dispatches locators who mark gas, water, electric, and telecom lines. Keep the locate ticket number on file. Once lines are marked, photograph the entire planned run and note any no-dig zones around irrigation heads, driveways, or tree root zones.
Measure the distance from your main panel to the gate post. Note soil conditions: sandy soil in coastal areas like Santa Monica or Malibu digs easily; rocky hillside lots in Bel Air or Studio City may require a boring rig or jackhammer.
Tools and PPE to have ready
- Shovel or mini-excavator (rent from a local equipment yard for runs over 50 ft)
- Conduit cutter and PVC primer/solvent cement
- Fish tape and pull string
- Multimeter and GFCI tester
- Torque screwdriver for grounding lugs
- Safety glasses, gloves, and steel-toed boots
Pro Tip: Photograph the entire conduit run before backfilling. Store the photos with your property records and note GPS coordinates of stub-ups and junction boxes. Future landscaping or irrigation work in Encino or Pasadena has uncovered unmarked conduit runs that cost homeowners thousands to repair.
How do you choose the right power source for your gate?
The right power source depends on your operator’s amperage, the distance from the panel, and what your local AHJ will approve.
Residential gate operators typically draw between 1 A and 8 A at 120V, though some heavy-duty slide gate motors can pull more.
Dedicated mains circuit is the right call when:
- The operator draws more than 4 A or runs accessories (heater, camera, intercom)
- The run is under 300 ft and trenching is feasible
- You want maximum reliability and the lowest long-term maintenance burden
Outdoor GFCI receptacle or subpanel works when:
- A weatherproof outlet already exists within 50 ft of the post
- The operator is a low-amp swing gate motor (under 3 A)
- You want a simpler permit path in some jurisdictions
Low-voltage transformer supply fits when:
- The operator accepts 24V DC and the run from transformer to post is short
- The transformer itself is fed by a properly permitted mains circuit in an accessible, weatherproof enclosure
- Power and data planning are handled together in a single conduit scope to avoid re-trenching later
Solar and battery system makes sense when:
- The run exceeds 300 ft or crosses a paved driveway requiring boring
- The gate cycles fewer than 30–40 times per day (most residential gates qualify)
- You want zero trenching and a self-contained system; see the solar gate guide for Los Angeles for sizing guidance specific to Southern California sun hours
Trenching and conduit: what depth and materials does code require?
Burial depth and conduit type are key considerations where many DIY installations face inspection challenges. Typical depths reflect common NEC and local rules, but confirm specifics with your AHJ before digging.
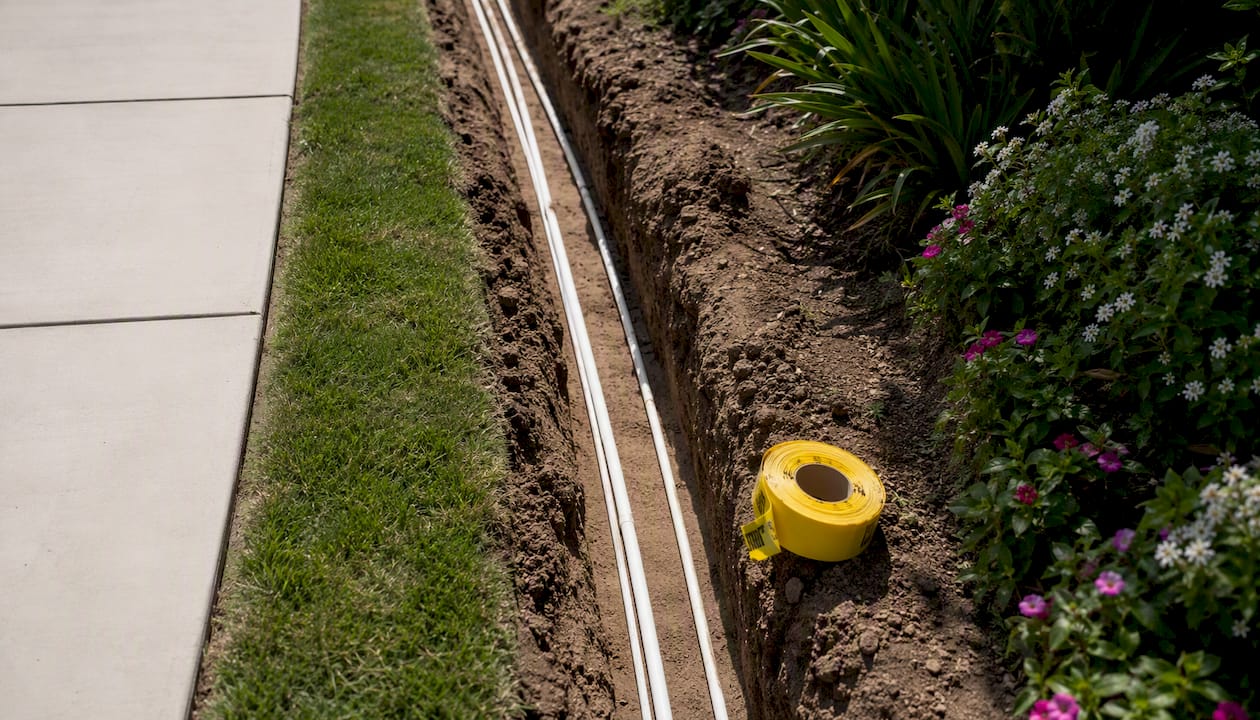
| Wiring Category | Typical Burial Depth | Conduit Type | Key Protection |
|---|---|---|---|
| Low-voltage / data | A shallow burial depth is commonly used | PVC Schedule 40 or direct-burial cable | Should be kept separate from power conduit |
| Line-voltage in conduit | Deeper burial is typically required | PVC Schedule 40 or RMC | Warning tape installed above conduit |
| Line-voltage direct-buried cable | Requires the greatest depth | Listed direct-burial cable | Warning tape installed above conduit |
| Exposed above grade | As per local code | EMT or RMC | Regular support straps and weatherproof fittings recommended |
Trenching best practices call for a trench bottom that is uniformly graded for drainage, with 4 inches of sand or fine gravel bedding under the conduit. Compact backfill in lifts rather than dumping it all at once, which prevents settling that can crack PVC joints.
For PVC runs, use solvent primer followed by solvent cement on every joint. Place expansion fittings at building entries and approximately every 200–250 ft on long runs to accommodate thermal movement. Lay 12-inch yellow warning tape directly above the conduit before final backfill, and photograph the tape in place for your permit inspection.
In rocky hillside neighborhoods like Brentwood or Bel Air, consider concrete encasement or marker posts at stub-up locations. Boring under driveways (common in Beverly Hills and Pasadena) avoids cutting pavement but adds $8–$20 per linear foot to the job cost.
Pro Tip: Run a spare conduit alongside your power conduit during the initial dig. The incremental material cost is small, and it gives you a ready path for future cameras, loop detectors, or Cat6 data cabling without re-opening the trench.
How do you size wire and avoid voltage drop on long runs?
Start with the motor’s nameplate FLA. Per NEC continuous-load sizing guidance, multiply FLA by 1.25 to get your minimum breaker rating, then select conductor AWG to match.
Worked example: A 120V swing gate motor with a 6 A FLA on a 200 ft run.
- Minimum breaker: 6 A × 1.25 = 7.5 A, round up to a 15 A breaker
- Voltage drop formula: VD = (2 × K × I × L) / CM, where K = 12.9 (copper), I = 6 A, L = 200 ft
- For 12 AWG copper (CM = 6,530): VD = (2 × 12.9 × 6 × 200) / 6,530 = 4.74 V, or about 3.9% at 120V
- That exceeds the 3% guideline for branch circuits, so upsize to 10 AWG (CM = 10,380): VD = (2 × 12.9 × 6 × 200) / 10,380 = 2.98 V, or 2.5% — within the recommended limit
Quick reference by distance and load:
- Under 100 ft, up to 8 A at 120V: 12 AWG THHN in conduit, 15 A breaker
- 100–200 ft, up to 8 A at 120V: 10 AWG THHN in conduit, 15 A breaker
- 200–400 ft, up to 8 A at 120V: 8 AWG THHN in conduit, 20 A breaker, or switch to 240V
- Over 400 ft or high-amp operator: Consider 240V supply or solar; consult a licensed electrician
A note on conductor fill: NEC Article 300 limits how many conductors you can pull through a single conduit. For a standard 120V circuit, you need at minimum a hot, neutral, and equipment grounding conductor. Never run individual conductors loose in a trench without a listed raceway or direct-burial cable rating.
How do you route conduit through the gate post itself?
Getting conduit into the post cleanly requires planning before the post is set. Once concrete is poured around a post, your options narrow considerably.
The cleanest method: stub the conduit up inside the post cavity before setting and backfilling. Leave 6–12 inches of conduit extending above the post base so you can connect to the operator’s wiring compartment without a visible external fitting. If the post is hollow steel or aluminum, the conduit can run entirely inside the post wall.
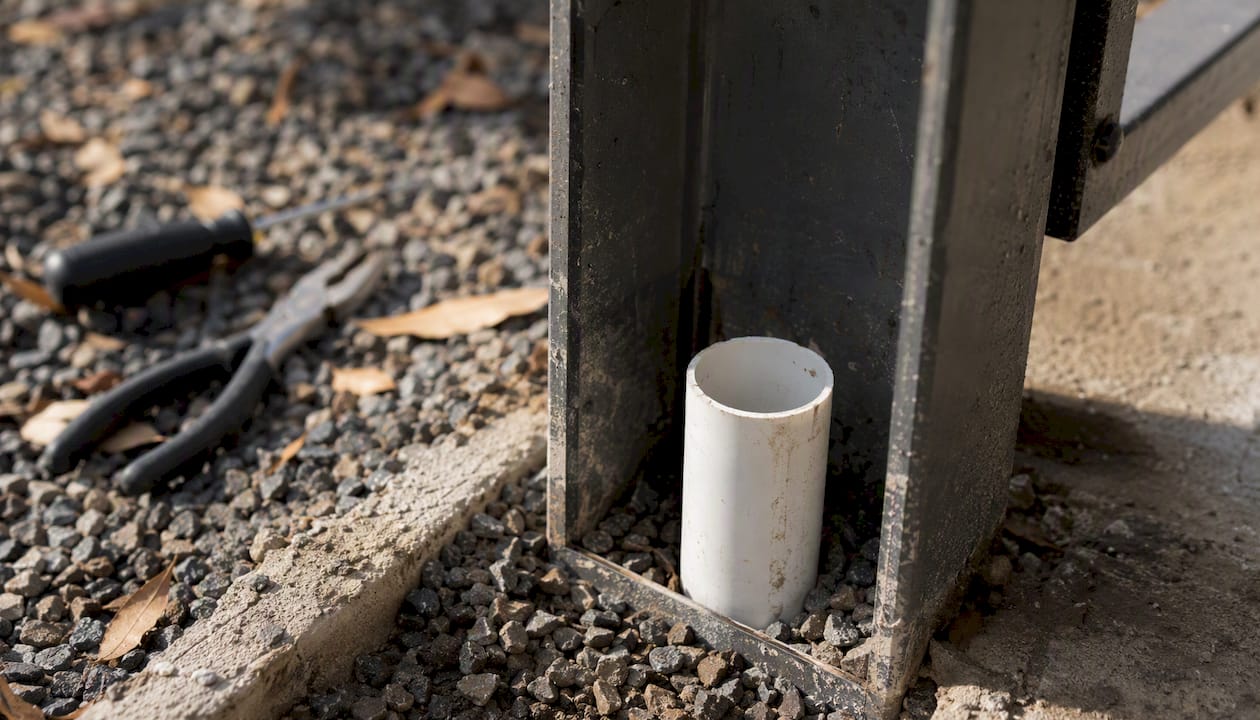
For posts already set in concrete, an LB conduit body or offset PVC fitting at the base of the post lets you transition from underground to the post exterior. Keep the fitting above the concrete surface so it remains accessible. Practical guidance from electricians recommends packing around conduit with pea gravel rather than concrete when future access matters, since pea gravel can be excavated without a jackhammer.
Junction boxes must stay accessible above grade. Buried splices are prohibited unless the conductor type and enclosure are specifically listed for direct burial and the product instructions allow it. A weatherproof handhole or pedestal box set 4–6 inches above grade gives you a clean, code-compliant splice point that an inspector can verify.
For aesthetics in high-end properties like those in West Hollywood or Bel Air, recessed covers and painted enclosures that match the post color keep the installation clean. A small above-grade pedestal box is far easier to service than a buried one.
On sealing penetrations: Use a listed flexible sealant at every point where conduit enters a post, slab, or foundation. Water that enters a conduit run can wick to the panel or operator and cause corrosion or faults. Watertight LB and RB fittings at bends are not optional in Southern California’s occasional heavy rain events.
Pro Tip: Pull a spare low-voltage conduit alongside your power conduit when routing through the post. Camera wiring, loop detector leads, and keypad data cables all need a path, and retrofitting them through a post already filled with concrete is a significant job.
What grounding, bonding, and GFCI protection does your gate circuit need?
These three requirements protect people from electrocution and equipment from damage. They are non-negotiable.
- Equipment grounding: Every metallic raceway, enclosure, and operator housing must be bonded to the equipment grounding conductor (EGC) that runs back to the panel. A green or bare copper wire in the conduit serves this purpose.
- System bonding: The EGC connects to the grounding electrode system at the main panel. Do not create a separate ground rod at the gate post and call it done; it must tie back to the panel’s grounding system.
- Overcurrent protection: Use a dedicated breaker sized per the motor’s FLA × 1.25. Never share the gate circuit with lighting, outlets, or other loads. Sharing circuits can cause nuisance tripping and may violate the operator’s listing requirements.
- GFCI protection: Outdoor receptacles and circuits in wet or damp locations require GFCI protection per NEC requirements. If your gate circuit feeds an outdoor receptacle at the post, that receptacle must be GFCI-protected. Many gate operators also benefit from a GFCI breaker at the panel for added protection.
- AHJ and listing: Per NEC provisions for gate operators, the AHJ interprets and approves equipment. ANSI/UL 325 listing on the operator itself is strong evidence of suitability. Bring the operator’s installation manual and listing documentation to your permit inspection.
If grounding and bonding are unfamiliar territory, stop here and hire a licensed electrician. Improper grounding is one of the leading causes of electrical fires and electrocution at residential gate installations.
How do you test and commission the system before backfilling?
Test before you backfill. Fixing a wiring fault after the trench is closed costs far more than the hour it takes to verify everything while the conduit is still exposed.
Commissioning checklist:
- Continuity test on the equipment grounding conductor from the operator housing back to the panel ground bus
- Polarity check at the operator’s terminal block (hot, neutral, ground correctly landed)
- GFCI test using a plug-in tester or the GFCI breaker’s test button
- Insulation resistance check if you have a megohmmeter available (optional but recommended for runs over 200 ft)
- Operator cycle test: run the gate through 5–10 full open/close cycles with all safety devices (photo-eyes, edge sensors) connected and verified
- Safety device test: block the photo-eye beam mid-cycle and confirm the operator reverses or stops
- Weather-seal inspection: check all enclosure gaskets, conduit fittings, and post penetrations for gaps
Document everything before backfill. Photograph final terminations inside the junction box, the GFCI test result, and the operator’s limit settings. Store a labeled wiring diagram inside the junction box or with your property’s permit records. An AHJ inspector may ask to see the installation before you close the trench, so schedule the inspection before you backfill.
Pro Tip: Label every conductor at both ends with a permanent marker or heat-shrink label before making final terminations. A gate circuit that needs service three years later is much faster to troubleshoot when every wire is identified.
Materials and tools shopping list
Once you’ve confirmed your power source, conductor size, and conduit route, gather these before the first shovel goes in the ground.
Materials:
- PVC Schedule 40 conduit (3/4 in. for a single 120V circuit; 1 in. for multiple circuits or 240V)
- PVC solvent primer and cement (gray or clear for Schedule 40)
- THHN/THWN-2 conductors in correct AWG (or listed direct-burial cable if not using conduit for the full run)
- Weatherproof junction box with gasket cover (NEMA 3R or 4X rated)
- LB or RB conduit bodies for bends at post entry
- Expansion fittings (one per building entry, one per 200–250 ft of run)
- Yellow warning tape (12 in. wide)
- Equipment grounding lugs and green grounding screws
- Watertight compression fittings at conduit-to-box connections
- Flexible sealant (listed for electrical penetrations)
- Sand or fine gravel for bedding (approximately 4 in. depth under conduit)
Tools:
- PVC pipe cutter or hacksaw with deburring tool
- Fish tape (50 ft minimum; 100 ft for longer runs)
- Multimeter and GFCI plug-in tester
- Torque screwdriver (for grounding lug torque specs)
- Trenching spade or rented mini-excavator
- Boring rig (rent or subcontract for under-driveway crossings)
- Level and tape measure
Scenario-specific additions:
- Short run, 120V operator: add a single-gang weatherproof box and 15 A GFCI breaker
- Long run with upsized conductor: add wire pulling lubricant and a larger conduit body for the pull
- Solar kit: add a solar panel mounting bracket, charge controller, and sealed AGM or lithium battery rated for outdoor temperatures
What does it cost, and when must you hire a licensed electrician?
Cost varies significantly by run length, soil conditions, and whether you’re boring under pavement. Here are realistic ranges for Los Angeles residential installations:
- Short run (under 75 ft), simple soil: $400–$900 in materials for a DIY conduit and wire pull; add $500–$1,200 for a licensed electrician to pull the permit and make the panel connection
- Medium run (75–300 ft), standard soil: $800–$2,000 in materials; electrician and permit costs typically add $1,000–$2,500 depending on panel location and AHJ scheduling
- Long run (over 300 ft) or pavement boring: Materials plus boring subcontractor can reach $3,000–$6,000+; rocky hillside lots in Bel Air or Brentwood add further cost for rock removal
Timeline for a typical residential project:
- Planning and permitting: 1–3 weeks (LA building departments vary; Pasadena and Glendale tend to be faster than LADBS for residential electrical)
- Trenching and conduit lay: 1–3 days for a DIY homeowner or small crew
- Electrical termination and inspection: 1–2 days, depending on AHJ scheduling
When you must hire a licensed electrician:
- Connecting to or modifying the main panel or subpanel
- Installing a new breaker
- Any line-voltage work in jurisdictions that require a licensed contractor (most of Los Angeles County)
- Complex grounding or bonding scenarios
- Any time the AHJ requires a licensed electrician’s signature on the permit
Hire checklist: Ask for a C-10 electrical contractor license (California’s electrical contractor classification), proof of liability insurance, and confirmation that they will pull the permit and coordinate the AHJ inspection. Keep the final inspection card and permit with your property records. A permit on file protects you at resale and confirms the work was done to code.
Pro Tip: In Los Angeles, schedule your AHJ inspection before backfilling the trench. LADBS and many city departments require an open-trench inspection for underground electrical work. Backfilling before the inspector signs off can result in a mandatory re-excavation.
Los Angeles permit notes and local cost example
Los Angeles homeowners face a specific set of permit and site conditions that affect both cost and timeline. The Los Angeles Department of Building and Safety (LADBS) requires an electrical permit for any new circuit, including gate operators. If the gate post is new construction, a separate fence or structure permit may also apply. Older neighborhoods in Culver City, Sherman Oaks, and parts of Burbank often have undocumented irrigation lines, old telephone conduit, and even abandoned gas lines that utility locators may not mark. Photograph your trench walls before backfill.
Local cost signals for two common scenarios:
- 50–100 ft run in standard soil (typical for Beverly Hills or Santa Monica flat lots): Expect $1,500–$3,500 fully installed, including permit, electrician, conduit, and operator connection. Boring under a concrete driveway adds $800–$2,000 to that range.
- 300–1,000 ft run on a hillside lot (Bel Air, Brentwood, or Encino): Rock removal, boring, and longer conduit runs push installed costs to $6,000–$15,000+. Solar becomes a serious alternative at this distance.
To convert your specific plan into a site-accurate installed estimate, use the gate automation estimator at Fence-gate-estimator. Enter your gate type, run distance, and automation preferences to get an immediate cost breakdown based on current Los Angeles labor and material rates. When you’re ready for a site visit, the estimate gives you a documented starting point for permit conversations with the AHJ and for comparing electrician bids.
If you’re planning a full driveway gate installation alongside the electrical work, the driveway gate service page covers automation options, gate types, and how electrical routing integrates with the mechanical installation scope.
What most guides get wrong about powering a gate post
The standard advice online is to “run a 20-amp circuit in conduit and call it done.” That framing misses the two decisions that actually determine whether the project goes smoothly: choosing the right power source before you dig, and understanding exactly where the DIY scope ends and the licensed electrician’s scope begins.
Most homeowners in Los Angeles underestimate the permit and inspection timeline. LADBS open-trench inspections can add a week or more to a project if you don’t schedule them before backfilling. The homeowners who get this right treat the permit as a project milestone, not an afterthought. They schedule the inspection appointment the same day they call 811.
The other overlooked point is voltage drop on long runs. A 12 AWG wire that’s perfectly adequate for a 50 ft run will cause nuisance faults and slow operation on a 200 ft run. That’s the difference between a gate that works reliably for years and one that generates service calls every winter.
Solar is genuinely underused for hillside and rural-adjacent properties in the LA area. A well-sized solar and battery system for a gate that cycles 20–30 times per day costs less than boring under 100 ft of concrete driveway. For properties in Bel Air, Brentwood, or the canyons above Sherman Oaks, the math often favors solar before the trench quote even comes back.
Sources
The sources below are the primary references for the code language, trenching standards, and sizing rules covered in this guide. Consult your AHJ directly for local interpretations, since NEC adoption and local amendments vary by jurisdiction.
- Underground Electrical Conduit Installation Guide - Delta Wye Electric
- Power + Data Planning for Automated Gates: Conduit, Trenching, Backup Power in One Scope
- What Size Breaker for Electric Gate? | Zimmer Gates & Doors
- Automatic Gate Installation: Openers, Wiring, and Integration
On AHJ authority: NEC Article 90.4 makes the AHJ the final word on code interpretation and equipment approval. Bring your operator’s installation manual, UL listing documentation, and this guide’s code references to your permit appointment. Inspectors respond well to homeowners who arrive prepared.
FAQ
How do I get power to my electric gate?
Run a dedicated 120V or 240V circuit from your main panel through buried conduit to a weatherproof junction box at the gate post. Call 811 before digging, pull an electrical permit, and have a licensed electrician make the panel connection.
Can I make my driveway gate electric without trenching?
Yes. A solar-powered gate operator with a battery backup eliminates the need for trenching entirely. Size the solar panel to your daily cycle count and confirm the battery capacity covers at least two days of operation without sun.
Does a gate motor use a lot of electricity?
Residential gate motors typically draw 1–8 A at 120V during operation, but they run only during each open or close cycle. Annual energy consumption for a typical residential gate is low, often comparable to a small appliance.
Do I need a permit to wire a gate opener in Los Angeles?
Yes. Any new circuit in Los Angeles requires an electrical permit. LADBS also requires an open-trench inspection for underground electrical work before backfilling, so schedule the inspection before you close the trench.
Recommended
- Solar powered gates: a Los Angeles homeowner’s guide | LA Electric Gate Service
- Gate Automation Process: A Homeowner’s Practical Guide | LA Electric Gate Service
- Modern Gate Design Process: A Los Angeles Homeowner’s Guide | LA Electric Gate Service
- Maintenance Tips for Gates: A Homeowner’s 2026 Guide | LA Electric Gate Service